Tuesday, June 30, 2020

Os Colludos Recibe Un Premio Por Su Crítica De La Realidad Social En El Concello De Neda


  • La comparsa de la Asociación Sociocultural ASCM,"Os Colludos", celebra sus diez años de vida con un premio por la crítica de la realidad social que realizan, a través de sus canciones.
Os Colludos reciben un diploma en Neda por la crítica de la realidad social.

La comparsa de "Os Colludos" de la Asociación Sociocultural ASCM celebra, este carnaval, su décimo aniversario y es esta la temática elegida por la agrupación para la celebración de esta festividad mágica. "Os Colludos" iniciaron la pasada semana su tradicional ronda de actuaciones en Afal (Casa del Mar) y el Centro DomusVi Narón. El pistoletazo de salida oficial del festejo tuvo lugar el viernes, en el concello de Neda, dónde la ASCM obtuvo un premio a la crítica de la realidad social por la reivindicación contenida en canciones y puesta en escena.

Foto de familia de la comparsa "Os Colludos".


El fin de semana, la actividad estuvo centrada en la localidad de origen de la agrupación: Narón. El sábado con la celebración del pasacalles y el concurso de comparsas y el domingo con la dinamización de los barrios. Hoy le toca el turno al concello de Ferrol, con un calendario repleto al que la entidad pondrá fin el 1 de marzo con una celebración para soplar las velas por el trabajo realizado en estos última década.

Os Colludos en el pasacalles de Narón.


"Os Colludos" es una comparsa de carácter inclusivo que nacía en 2010 con vocación de favorecer e impulsar la participación del colectivo de personas con discapacidad en eventos de tipo popular. Desde su nacimiento participan en ella personas con y sin discapacidad, de todas las edades, fomentando un ambiente de carácter intergeneracional e inclusivo. Además, sus letras comprometidas con la lucha por la accesibilidad universal o la inclusión han servido para visibilizar una realidad entre la ciudadanía en general. Entre los logros de la agrupación colluda está el de haber logrado concienciar a las administraciones de la necesidad de programar este tipo de eventos desde una clave de accesibilidad; permitiendo el acceso a escenarios, realización de pasacalles, etc. por personas con capacidades diversas.

Solo nos queda desear que sus demandas sean escuchadas y que sigan saliendo a llenar las calles del color y el son de la inclusión otros 10 años y muchísimos más.


Actuación "Os Colludos"en Neda con su tema "Chiki-Neda".

¡Sois enormes, Colludos!

Related posts


Ethical hacking : Top 9 best websites to learn hacking

  • Packet Storm: Information Security Services, News, Files, Tools, Exploits, Advisories and Whitepapers.
  • KitPloit: Leading source of Security Tools, Hacking Tools, CyberSecurity and Network Security.
  • Exploit DB: An archive of exploits and vulnerable software by Offensive Security. The site collects exploits from submissions and mailing lists and concentrates them in a single database.
  • Hakin9: E-magazine offering in-depth looks at both attack and defense techniques and concentrates on difficult technical issues.
  • Hacked Gadgets: A resource for DIY project documentation as well as general gadget and technology news.
  • Phrack Magazine: Digital hacking magazine.
  • HackRead: HackRead is a News Platform that centers on InfoSec, Cyber Crime, Privacy, Surveillance, and Hacking News with full-scale reviews on Social Media Platforms.
  • The Hacker News: The Hacker News — most trusted and widely-acknowledged online cyber security news magazine with in-depth technical coverage for cybersecurity.
  • Metasploit: Find security issues, verify vulnerability mitigations & manage security assessments with Metasploit. Get the worlds best penetration testing software now.

Thursday, June 11, 2020

S2 Dynamic Tracer And Decompiler For Gdb

Decompiling is very useful for understanding srtipped binaries, most dissasemblers like IDA or Hopper have a plugin for decompiling binaries, generating a c like pseudocode.

Static analysis, is very useful in most of cases, specially when the binary is not so big, or when you just have an address where to start to analyze. But some algorithms will be learned in less time by dynamic analysis like tracing or debugging.

In cookiemonsters team, we are working on several tracers with different focus, but all of them mix the concept of tracing and decompiling to generate human-readable traces.

S2 is my tracer & decompiler plugin for gdb, very useful for ctfs.
Some of the features are:

- signed/unsigned detecion
- conditional pseudocode (if)
- syscall resolution
- unroll bucles
- used registers values
- mem states
- strings
- logging


More information

BASICS OF METASPLOIT – BASIC COMMANDS OF METASPLOIT

Metasploit is an advanced hacking tool that comes itself with a complete lack of advanced penetration testing tools. Penetration testers and hackers are taking so much advantage of this tool. It's a complete hack pack for a hacker that he can play almost any attack with it. Here I am going to discuss the basics of Metasploit. I am not covering attacks in this article, as I am just making sure to share the basics of Metasploit and basic commands of Metasploit. So, we can get back to cover attacks of Metasploit in the next articles.

BASICS OF METASPLOIT

The Metasploit framework has three types of working environments.
  1. msfconsole
  2. msfcli interface
  3. msfweb interface
However, the most preferred and used is the 'msfconsole'. It's a very efficient command-line interface that has its own set of commands and system's working environment.
First of all, it's most important to know and understand all the useful commands of Metasploit that are going to be used.

BASIC COMMANDS OF METASPLOIT

Metasploit have a huge number of command that we can use in different type of attacks, but I am just going to share the most used and useful commands here that a beginner can easily understand and follow 'em.
  • help (It will give the basic commands you need to launch an exploit.
  • search (Finds out the keywords in the selected attack method).
  • show exploits (Shows list of an available exploit in the selected option).
  • show payloads (It lists all the payloads available).
  • show options (It helps you to know all the options if you might have forgotten one).
  • info (This is used to get information about any exploit or payload).
  • use (It tells Metasploit to use the exploit with the specified name).
  • set RHOST (Sets the address of specified remote host).
  • set RPORT (Sets up a port that connects to on the remote host).
  • set PAYLOAD (It sets the payload that gives you a shell when a service is exploited).
  • set LPORT (Sets the port number that the payload will open on the server when an exploit is exploited).
  • exploit  (It actually exploits the service).
  • rexploit (Reloads your exploit code and then executes the exploit without restarting the console).
These are the most used Metasploit commands which come in handy in most of the situations during any sort of attack. You must give all the commands a try and understand 'em how it works and then move to the next part of designing an attack.
More information
  1. Hackerrank
  2. Pentest Example Report
  3. Hacking The Art Of Exploitation
  4. Pentest Environment
  5. Hacking Jailbreak
  6. Hackintosh
  7. Pentest Process
  8. Hacking For Dummies
  9. Pentest Security
  10. Hacking Games
  11. Hacking For Dummies
  12. Pentest Checklist
  13. Hackintosh
  14. Pentest Practice Sites
  15. Pentest Questions
  16. Pentest Website
  17. Hacker Language
  18. Hacker Website

How To Install Windscribe - The Best Free VPN On GNU/Linux Distros?


Why should you use Windscrive?
   Windscribe is well-known for their free VPN service but they also have a paid version. Only with a free account, you will get 10 countries to connect through and change your real IP address and 10GB of free traffic (if you use an email to sign up Windscribe), and unlimited devices.

   The Free version is awesome, but the Pro one is even better! With Pro version you will get Unlimited DataUnblock over 60 Countries and 110 CitiesConfig Generator (OpenVPN, IKEv2, SOCKS5), and full protection from R.O.B.E.R.T.

   For your information, Windscribe is one of the best VPN services in the category Free AuditValue Audit and Overall Audit in BestVPN.com Awards 2019 (Read the White Paper here). You totally can believe in Windscribe (100% no logs).

   And about R.O.B.E.R.T, it's an advanced DNS level blocker that protects you from MalwareAds and TrackersSocial trackingPornGamblingFake NewsClickbait and Cryptominers. Read more about R.O.B.E.R.T.


Anyway, Windscribe helps you:
  • Stop tracking and browse privately: Governments block content based on your location. Corporations track and sell your personal data. Get Windscribe and take back control of your privacy.
  • Unblock geo-restricted content: Windscribe masks your IP address. This gives you unrestricted and private access to entertainment, news sites, and blocked content in over 45 different countries.
  • Take your browsing history to your grave: Protect your browsing history from your network administrator, ISP, or your mom. Windscribe doesn't keep any logs, so your private data stays with you.
  • Stop leaking personal information: Prevent hackers from stealing your data while you use public WIFI and block annoying advertisers from stalking you online.
  • Go beyond basic VPN protection: For comprehensive privacy protection, use our desktop and browser combo (they're both free).

   Windscribe also supports Chrome browser, Firefox browser, Opera browser, Smart TV, Routers, Android, iOS, BlackBerry, Windows OS, Mac OS X and GNU/Linux OS, you name it.

   You can install Windscribe on Ubuntu, Debian, Fedora, CentOS, Arch Linux and their based distros too.

   But to install and safely use Internet through Windscribe, you must sign up an account first. If you already have an account then let's get started.

How to install Windscribe on Arch and Arch-based distros?
   First, open your Terminal.

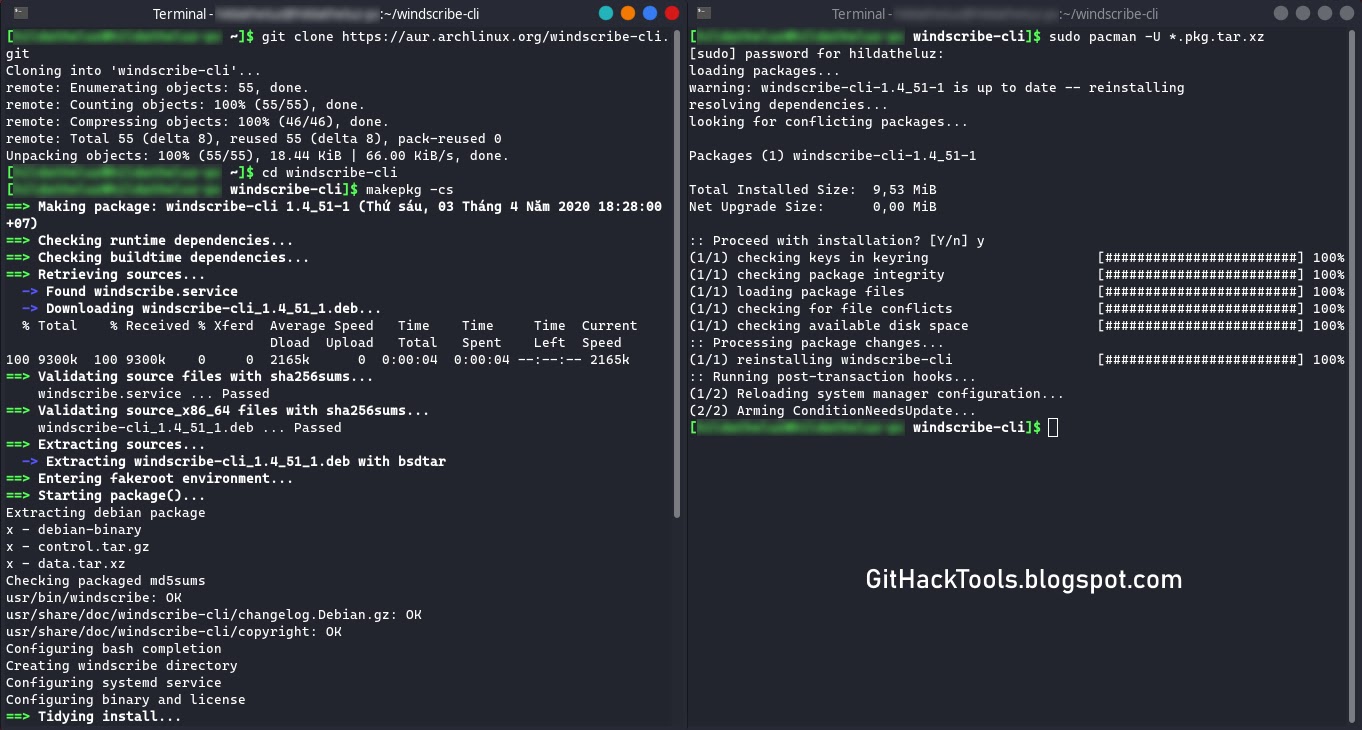
   For Arch Linux and Arch-based distro users, you can install Windscribe from AUR. Run these commands without root to download and install Windscribe on your Arch:


   For other distro users, go to VPN for Linux - Windscribe choose the binary file that compatible with your distro (.DEB for Debian and Ubuntu based, .RPM for Fedora and CentOS based) and then install it.
dpkg -i [Windscribe .DEB package]
rpm -ivh [Windscribe .RPM package]


   Or you can scroll down to Pick Your Distro, click to the distro version you use, or click to the distro version that your distro is based on and follow the instructions.

   Now enter these commands to auto-start a and log in to Windscribe.

   Enter your username and password and then you can enjoy Windscribe's free VPN service.

How to use Windscribe on Linux?
   This is Windscribe list of commands (windscribe --help):
   If you want Windscribe to chooses the best location for you, use windscribe connect best.

   But if you want to choose location yourself, here is the list of Windscribe's locations:
   *Pro only
   Example, i want to connect to "Los Angeles - Dogg", i use windscribe connect Dogg.

   If you want to stop connecting through Windscribe use windscribe disconnect.

   For some reasons, you want to log out Windscribe from your device, use windscribe logout.

I hope this article is helpful for you 😃


Related articles


Nmap: Getting Started Guide


Nmap is a free utility tool for network discovery, port scanning and security auditing, even though we can use it for more than that but in this article we will learn how to do these three things with nmap.

The original author of nmap is Gordon Lyon (Fyodor). Nmap is licensed under GPL v2 and has available ports in many different languages. Nmap is available for Linux, Windows, and Mac OS X. You can download your copy of nmap from their website.

Lets get started with nmap.

When performing pentests we always look for networks we are going to attack. We need to identify live hosts on the network so that we can attack them. There are plenty of tools available for finding live hosts on a network but nmap is one of the best tools for doing this job.

Lets start with simple host (target) discovery scans i,e scans that will tell us which ip address is up on our target network. Those ip addresses which are up on our target network are the ones that are assigned to a device connected on our target network. Every device on the network is going to have a unique ip address.
To perform a simple host discovery scan we use the following command

nmap -v -sn 10.10.10.0/24


flags we used in the above command are
-v for verbose output
-sn to disable port scan (we don't want to scan for ports right now)

Following the flags is the ip address of the target network on which we want to look for live hosts. The /24 at the end of the ip address is the CIDR that specifies the subnet of the network on which we are looking for live hosts.

After running the above command you should get a list of live hosts on your target network.
If you just want to know the list of ip addresses your command is going to scan, you can use the -sL flag of the nmap like this.

nmap -sL 10.10.10.0/24

this command will simply output the list of ip addresses to scan.

We sometimes want to do dns resolution (resolving ip addresses to domain names) when performing our network scans and sometimes we don't want dns resolution. While performing a host discovery scan with nmap if we want to perform dns resolution we use -R flag in our command like this:

nmap -v -sn -R 10.10.10.0/24

And if we don't want to perform dns resolution of hosts during our scan we add the -n flag to our command like this:

nmap -v -sn -n 10.10.10.0/24

After we have discovered the hosts that are up on our target network, we usually put the ip addresses of these hosts into a file for further enumeration.

Next step in our enumeration would be to detect which operating system and which ports are running on these live hosts, for that we run this command:

nmap -O -v 10.10.10.119


here we use -O (capital o not zero) for operating system detection and by default nmap performs SYN Scan for port discovery. However nmap scans for 1000 ports only by default of a particular host.

To make nmap go over a list of ip addresses in a file we use -iL flag like this:

nmap -O -v -iL targetlist

where targetlist is the name of the file which contains ip addresses that we want to perform port scan on.

To make nmap scan all the ports of a target we use the -p flag like this:

nmap -p- -v 10.10.10.121

We can also specify a range of ports using the -p flag like this:

nmap -p1-500 -v 10.10.10.121

here 1-500 means scan all the ports from 1 to 500.

We can use a number of scan techniques to discover open ports on our network but I will only discuss some of them for brevity.

We can perform a TCP SYN scan using nmap with -sS flag like this:

nmap -sS -v 10.10.10.150

We have also flags for TCP connect and ACK scans which are -sT -sA

nmap -sT -v 10.10.10.150

nmap -sA -v 10.10.10.150

We can also perform UDP scan as well instead of TCP scan using -sU flag

nmap -sU -v 10.10.10.150

We can perform TCP Null, FIN, and Xmas scans using the flags -sN, -sF, -sX

nmap -sN -v 10.10.10.150

nmap -sF -v 10.10.10.150

nmap -sX -v 10.10.10.150

If you don't know what these scans are then please visit Port Scanning Techniques and Algorithms for explanation.

After discovering the open ports on our target host, we want to enumerate what services are running on those open ports. To enumerate services and versions information on open ports we use the -sV flag like this:

nmap -sV -v 10.10.10.118

This should give us information about what services are running on what ports and what versions of those services are running on the target host.

nmap has an interesting feature called NSE nmap scripting engine. It allows users to write their own scripts, using the Lua programming language, to automate a wide variety of networking tasks. nmap ships with a diverse set of scripts which are very helpful to enumerate a target. To use the nmap default set of scripts while enumerating the target, we use the -sC flag like this:

nmap -sC -sV -v 10.10.10.118

We can also save the results of our nmap scans to a file using the -o flag like this

nmap -sC -sV -v -oA defaultscan 10.10.10.119

here -oA tells the nmap to output results in the three major formats at once and defaultscan is the name of the file that will be prepended to all the three output files.

This is the end of this short tutorial see you next time.

References:
https://nmap.org/book/scan-methods-null-fin-xmas-scan.html

Related news